第4章 エラー実装をしてみよう
4.1 入力値チェックをしよう
Spring入門7章でエンティティのバリデーションについて学びました。今回はエンティティのバリデーションを使用して、入力値チェックをするプログラムを作成します。
バリデーションとは、モデルに用意されている、値を検査するための仕組みです。あらかじめ入力される各項目にルールを設定しておくことで、入力値がそのルールに違反していないかを調べ、すべてのルールを満たしている場合のみ値の保管などを行えるようにします。
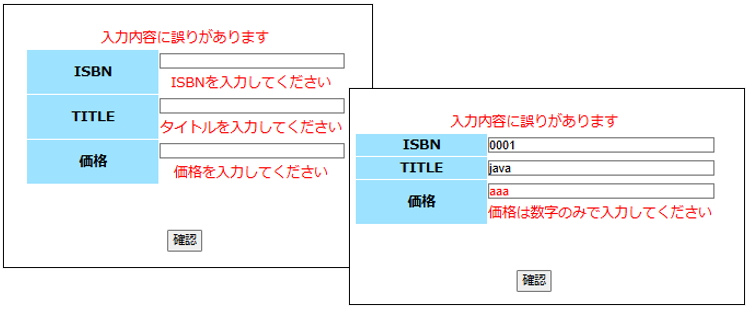
実行結果
フォルダ構造
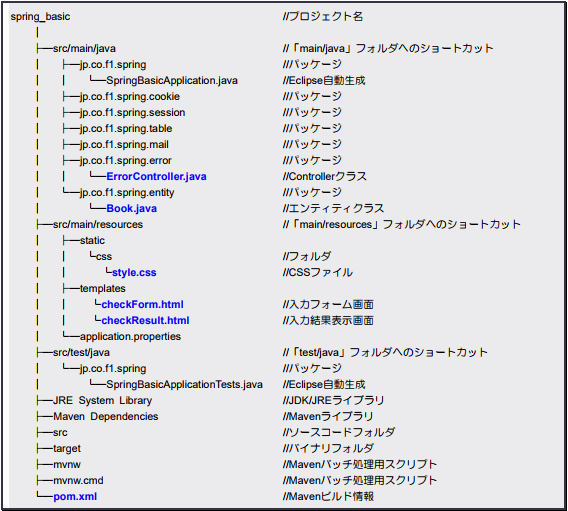
CSSファイルの配置
- 「src/main/resources」パッケージの「static」フォルダ内に「css」フォルダを作成
- 1 で作成した「css」フォルダ内に下記からダウンロードした「style.css」を配置
https://kanda-it-school-kensyu.com/docs/sample/text/
【ファイル名:pom.xml】(追記)
<dependency>
	<groupId>org.springframework.boot</groupId>
	<artifactId>spring-boot-starter-validation</artifactId>
</dependency>
【ファイル名:Book.java】(追記)
package jp.co.f1.spring.entity;
import jakarta.persistence.Column;
import jakarta.persistence.Entity;
import jakarta.persistence.Id;
import jakarta.persistence.Table;
import jakarta.validation.GroupSequence;
import jakarta.validation.constraints.NotEmpty;
import jakarta.validation.constraints.Pattern;

@Entity
@Table(name = "bookinfo")
public class Book {
	public interface Group1 {}
	public interface Group2 {}
	@GroupSequence({
		Group1.class,
		Group2.class
	})
	public interface All {}

	// ISBN
	@Id
	@Column(length = 20)
	@NotEmpty(message = "ISBNを入力してください", groups = Group1.class)
	private String isbn;
	public String getIsbn() {
		return isbn;
	}

	public void setIsbn(String isbn) {
		this.isbn = isbn;
	}

	// タイトル
	@Column(length = 100, nullable = true)
	@NotEmpty(message = "タイトルを入力してください", groups = Group1.class)
	private String title;
	public String getTitle() {
		return title;
	}

	public void setTitle(String title) {
		this.title = title;
	}

	// 価格
	@Column(length = 11, nullable = true)
	@NotEmpty(message = "価格を入力してください", groups = Group1.class)
	@Pattern(regexp = "^[0-9]+$", message = "価格は数字のみで入力してください", groups = Group2.class)
	private String price;
	public String getPrice() {
		return price;
	}

	public void setPrice(String price) {
		this.price = price;
	}
}
【ファイル名:ErrorController.java】
package jp.co.f1.spring.error;

import org.springframework.stereotype.Controller;
import org.springframework.validation.BindingResult;
import org.springframework.validation.annotation.Validated;
import org.springframework.web.bind.annotation.ExceptionHandler;
import org.springframework.web.bind.annotation.GetMapping;
import org.springframework.web.bind.annotation.ModelAttribute;
import org.springframework.web.bind.annotation.PostMapping;
import org.springframework.web.servlet.ModelAndView;

import jp.co.f1.spring.entity.Book;

@Controller
public class ErrorController {

	/**
	 * 「/check」へGET送信された場合
	 */
	@GetMapping("/check")
	// POSTデータをBookインスタンスとして受け取る
	public ModelAndView check(@ModelAttribute Book book, ModelAndView mav) {
		// 画面に出力するViewを指定
		mav.setViewName("checkForm");
		// ModelとView情報を返す
		return mav;
	}

	/**
	 * 「/check」へPOST送信された場合
	 */
	@PostMapping("/check")
	// POSTデータをBookインスタンスとして受け取る
	public ModelAndView check(@ModelAttribute @Validated(Book.All.class) Book book, BindingResult result, ModelAndView mav) {
		// 入力エラーがある場合
		if(result.hasErrors()) {
			// エラーメッセージ
			mav.addObject("message", "入力内容に誤りがあります");
			// 画面に出力するViewを指定
			mav.setViewName("checkForm");
		} else {
			// 画面に出力するViewを指定
			mav.setViewName("checkResult");
		}
		return mav;
	}
}
【ファイル名:checkForm.html】
<!DOCTYPE html>
<html>
<meta charset="UTF-8">
<title>入力値チェックをしてみよう</title>
<link rel="stylesheet" th:href="@{/css/style.css}">

<body>
  <div id="main" class="container">
    <!-- エラーメッセージ -->
    <p class="error-msg" th:if="${message} != null" th:text="${message}"></p>
    <!-- 入力フォーム -->
    <form action="/check" method="POST" th:object="${book}">
      <table class="input-table" align="center">
        <tr>
          <th>ISBN</th>
          <td>
            <input type="text" name="isbn" th:value="*{isbn}" th:errorclass="error-msg">
            <p th:if="${#fields.hasErrors('isbn')}" th:errors="*{isbn}" th:errorclass="error-msg"></p>
          </td>
        </tr>
        <tr>
          <th>TITLE</th>
          <td>
            <input type="text" name="title" th:value="*{title}" th:errorclass="error-msg">
            <p th:if="${#fields.hasErrors('title')}" th:errors="*{title}" th:errorclass="error-msg"></p>
          </td>
        </tr>
        <tr>
          <th>価格</th>
          <td>
            <input type="text" name="price" th:value="*{price}" th:errorclass="error-msg">
            <p th:if="${#fields.hasErrors('price')}" th:errors="*{price}" th:errorclass="error-msg"></p>
          </td>
        </tr>
      </table>
      <input type="submit" value="確認">
    </form>
  </div>
</body>

</html>
【checkResult.html】
<!DOCTYPE html>
<html>

<head>
  <meta charset="UTF-8">
  <title>入力値チェックをしてみよう</title>
</head>

<body>
  <p>正しく入力できていました。</p>
</body>

</html>
アプリケーションにアクセス
以下のアドレスからアプリケーションにアクセスします。
URL:http://localhost:8080/check
解説
・@Pattern
こちらは7章でも紹介されています。正規表現のパターンを指定して入力チェックを行います。引数の「regexp」という値にパターンの文字列を指定し、指定した正規表現に一致するかどうかをチェックします。今回はこの「regexp」に『”^[0-9]+$”』という正規表現を渡しています。これは、数字のみで入力されているかどうかをチェックしてくれます。正規表現は他にもあるので気になる方は調べてみてください。
・@GroupSequence
バリデーションの結果がNGになるとチェックに引っ掛かった分だけエラーメッセージが表示されてしまいます。そのため、バリデーションの実行順序を設定する必要があります。そこで使用するのがバリデーションのグループ設定です。@GroupSequenceアノテーションは、バリデーションの順番を設定します。サンプルコードでは以下の順番でチェックされます。
- Group1
- Group2
価格の入力チェックは①空白チェック②数字チェック(数字のみで入力されているか)の2つをチェックする必要があります。Group1を①空白チェック、Group2を②数字チェックとしてバリデーションの実行順序を設定しています。